Tried to get it down to as short as possible -but hope you enjoy watching him work as much as I do.. It really means more to me to watch him work rather than shoot the birds, but I think he would get a little miffed if he didn't get to catch them or bring them back..
Friday, December 26, 2014
As promised - here is Ike video from last week
Ike did a really good job working the grass.. I wish I would have shot better - but I didn't.
Tried to get it down to as short as possible -but hope you enjoy watching him work as much as I do.. It really means more to me to watch him work rather than shoot the birds, but I think he would get a little miffed if he didn't get to catch them or bring them back..
Tried to get it down to as short as possible -but hope you enjoy watching him work as much as I do.. It really means more to me to watch him work rather than shoot the birds, but I think he would get a little miffed if he didn't get to catch them or bring them back..
Sunday, December 21, 2014
Apple pie of my eye and then some
Hello and Merry Christmas everyone;
Just wanted to get on and share a few items about both of my favorite things - Cooking and Ike.. First cooking.. As per the title, for my family Christmas dinner I offered to make a fruit pie for desert- can't make a pecan pie due to some nut allergies in the house and decided it would be an apple. The problem I always seem to have with apple pies is when I make the filling from scratch, they never seem to be firm - always runny and a soggy bottom crust. I was NOT about to let that happen.. So to Google I went. Looked for some apple pie recipes, and do you know there are about 500 pie recipes entitled "THE BEST APPLE PIE RECIPE"???? Now, we all know the internet is 100% truthful and no one ever exaggerates on the internet so I was confused. (OK tongue is so firmly in my cheek it is good I am typing and not talking here, LOL:) ) But I did find one that sounded good and said it would not be runny.... So here is the link...
Couple of key points:
Take a look at the pie - trust me while no pics after cutting it was picture perfect inside. Oh and while good, it was time consuming.. you aren't going to make this pie an hour before the dinner....

Now for the other "apple" of my eye, Ike. We went hunting again over at Hickory Grove last Sunday and Ike did very well. No issues with his leg and there was definitely nothing wrong with his nose.. My shooting on the other hand left a little to be desired. I guess I was a little over confident, and trying to let the birds get further out as to not damage them so much but I wasn't really hitting them hard. We did fine as we placed 3 and got three but missed a scratch bird that he really worked hard for and I felt bad.... I have some good video of him working I will edit and post later but he pointed well, found the runner and delivered them to hand (well not quite to hand but pretty close :) ). Anyway he did well take a look...


Merry Christmas to all and to all a good hunt... "Ike, find that bird!"
Just wanted to get on and share a few items about both of my favorite things - Cooking and Ike.. First cooking.. As per the title, for my family Christmas dinner I offered to make a fruit pie for desert- can't make a pecan pie due to some nut allergies in the house and decided it would be an apple. The problem I always seem to have with apple pies is when I make the filling from scratch, they never seem to be firm - always runny and a soggy bottom crust. I was NOT about to let that happen.. So to Google I went. Looked for some apple pie recipes, and do you know there are about 500 pie recipes entitled "THE BEST APPLE PIE RECIPE"???? Now, we all know the internet is 100% truthful and no one ever exaggerates on the internet so I was confused. (OK tongue is so firmly in my cheek it is good I am typing and not talking here, LOL:) ) But I did find one that sounded good and said it would not be runny.... So here is the link...
Couple of key points:
- Cooking and cooling the apples first, before you put them in the pie shell.
- Using an egg white wash on the bottom crust before you put the apples in
- Use of a cornstarch, and tapioca slurry while cooking the apples.
Take a look at the pie - trust me while no pics after cutting it was picture perfect inside. Oh and while good, it was time consuming.. you aren't going to make this pie an hour before the dinner....
Now for the other "apple" of my eye, Ike. We went hunting again over at Hickory Grove last Sunday and Ike did very well. No issues with his leg and there was definitely nothing wrong with his nose.. My shooting on the other hand left a little to be desired. I guess I was a little over confident, and trying to let the birds get further out as to not damage them so much but I wasn't really hitting them hard. We did fine as we placed 3 and got three but missed a scratch bird that he really worked hard for and I felt bad.... I have some good video of him working I will edit and post later but he pointed well, found the runner and delivered them to hand (well not quite to hand but pretty close :) ). Anyway he did well take a look...
Merry Christmas to all and to all a good hunt... "Ike, find that bird!"
Tuesday, November 25, 2014
Ike is back in town - Some hunting photos
Ike is back at it.
After some prescribed R&R by the Vet, Ike and I gave it a trial run at Hickory Grove. We went out on Halloween and with the help of friend Wayne as photographer, we got some really nice shots of Ike in action. Thanks Wayne!!
After some prescribed R&R by the Vet, Ike and I gave it a trial run at Hickory Grove. We went out on Halloween and with the help of friend Wayne as photographer, we got some really nice shots of Ike in action. Thanks Wayne!!
 |
| On Point #1 |
 |
| On Point #2 |
He did great and while a little sore no problems with the Achilles!!!!
We then went back a couple weeks later to try again as part of the Blackhawk Sportsman Club Walk up Hunts and Mike and crew put out 3 birds for us. Well we saw 7 and got 5 and the 4 scratch birds we saw were all in the trees.. Kind of like hunting grouse - now I know why a short barreled shotgun is so desirable when going for grouse.. by myself and not in good position when those birds flushed - didn't even get a shot off at 2 of them - through the trees.. But the last one was worth a little story...
We had gotten 4 and saw the other two I mentioned above and it was about time for lunch so we were headed back to the house when we heard a rooster cackle in the trees.. I looked at Ike and said, "OK, we have 15 minutes lets go make that rooster pay for his teasing us." Ike took off and headed into the trees and I learned from the others in there that I was not going to stay too close and let him kind of work on his own and stay back and in better position. Well sure enough he got birdy down by a little pond and I fought the urge to go in there and kick up the bird. I thought just let the bird get nervous- with Ike on point and give it a couple of minutes - I figured that since he was not recently placed, the rooster would get a little antsy and flush on his own. Sure enough after about a minute (and enough time to get in a clear shooting position) we were rewarded with a cackling busting rooster. He flew right over me and I dropped him right over my head. I walked over and saw a rooster with the longest tail... So take a look - I measured the tail and it was a full 24" long.. Perhaps I should have saved the bird but I didn't but I did bring the tail feathers home...
 |
| Nice Bird |
So Ike is back and pheasants don't sleep well at night LOL.. And we are officially back to "Ike find that bird"
Monday, September 22, 2014
Update on Ike & Other Things
Hi everyone;
As promised I wanted to give an update on Ike after his visit to the Vet today. The Dr., while very pleased with his recovery, says at least 2-3 more weeks in a soft wrap and then as long as another month with nothing but controlled (read on a leash) exercise. Soooo, that pretty much means the annual Pheasant Hunt in SD is off for us this fall. Perhaps we can go later in the season but after talking to the Vet, he says that given his youth, and desire to hunt for many more years, he would recommend short term discretion for more long term opportunities. That is what my friend Wayne says too, better to take off a while and give him the proper chance to recover rather than rush it and regret any reoccurrence. So I thought I would share a couple pictures of the little guy with his new soft wrap. The Vet Tech thought he would enjoy a little decoration on his wrap.. Check it out, a squirrel, Oak leaf and acorn.. Little did she know how much he hates squirrels (or then again maybe she did ?????) I'll let everyone know what the next visit brings.
Since Ike may not be hunting this fall in his honor I took some pheasant out of the freezer and made a few pot pies... 2 large ones and 3 small ones (those are for me). I had some extra so I made a little one in my small cast iron skillet with a Bisquick topping.. See link for the recipe - made a few alterations - added mushrooms, and celery and used cream of celery soup for the base.. For the topping I mixed up the typical recipe but added some shredded cheese, some canned French fried onion rings, and Old Bay seasoning to the batter... It was pretty tasty
http://www.food.com/recipe/easy-bisquick-chicken-pot-pie-100215
Also did a quick little chicken finger recipe... Flour, garlic powder, onion powder, salt, pepper and a little paprika, egg wash, and cornflakes with some canned fired onion rings crushed for the crust.... Fried them in Veg oil for about 3 minutes a side then finished them in the oven.. Made a little home made Honey mustard for dipping.. Really tasty and crunchy..
So again no "Ike, Find that bird" - at least for a while.
As promised I wanted to give an update on Ike after his visit to the Vet today. The Dr., while very pleased with his recovery, says at least 2-3 more weeks in a soft wrap and then as long as another month with nothing but controlled (read on a leash) exercise. Soooo, that pretty much means the annual Pheasant Hunt in SD is off for us this fall. Perhaps we can go later in the season but after talking to the Vet, he says that given his youth, and desire to hunt for many more years, he would recommend short term discretion for more long term opportunities. That is what my friend Wayne says too, better to take off a while and give him the proper chance to recover rather than rush it and regret any reoccurrence. So I thought I would share a couple pictures of the little guy with his new soft wrap. The Vet Tech thought he would enjoy a little decoration on his wrap.. Check it out, a squirrel, Oak leaf and acorn.. Little did she know how much he hates squirrels (or then again maybe she did ?????) I'll let everyone know what the next visit brings.
 |
| Cute, huh? |
 |
| Spoiled??? Who me??? |
Since Ike may not be hunting this fall in his honor I took some pheasant out of the freezer and made a few pot pies... 2 large ones and 3 small ones (those are for me). I had some extra so I made a little one in my small cast iron skillet with a Bisquick topping.. See link for the recipe - made a few alterations - added mushrooms, and celery and used cream of celery soup for the base.. For the topping I mixed up the typical recipe but added some shredded cheese, some canned French fried onion rings, and Old Bay seasoning to the batter... It was pretty tasty
http://www.food.com/recipe/easy-bisquick-chicken-pot-pie-100215
 |
| Pheasant Pot Pie |
Also did a quick little chicken finger recipe... Flour, garlic powder, onion powder, salt, pepper and a little paprika, egg wash, and cornflakes with some canned fired onion rings crushed for the crust.... Fried them in Veg oil for about 3 minutes a side then finished them in the oven.. Made a little home made Honey mustard for dipping.. Really tasty and crunchy..
 |
| Chicken Fingers
|
Saturday, September 13, 2014
Pork Chops in Peach Preserves
Well, now that Ike is out of commission, I decided to get back out there and do some cooking and post out this Pork Chop in Peach preserves recipe. As you know peaches are in season now and to me there is nothing better than biting into a ripe peach with the juice running down your chin....
Well there might be a couple things better - like combining my love of peaches with my love of pork. Here is a recipe for pork chops in a peach preserve glaze. Couple of interesting ingredients - cinnamon and ginger as the rub for the pork...
Here is what you need:
Allrecipes Spicy Peach Glazed Pork Chops (I think mine look better)
In a bowl I mixed together the peach preserves Worcestershire sauce and Chile Paste. I added the white wine at this point. Rinse and pat dry the pork chops and season with ginger, cinnamon, and salt and pepper. I then put the sauce in a sauce pan and started cooking and reducing it. I dropped the chops on a very hot grill and seared them to about rare. After the sauce reduced about 1/3 I dropped the chops in the sauce and let them finish cooking in the sauce. It took on a beautiful amber color and thickened to a wonderful consistency. Sweet yet tangy with the chile paste with interesting undertones from the cinnamon and ginger. It was VERY good....
Well there might be a couple things better - like combining my love of peaches with my love of pork. Here is a recipe for pork chops in a peach preserve glaze. Couple of interesting ingredients - cinnamon and ginger as the rub for the pork...
Here is what you need:
- 1 cup peach preserves
- 1 1/2 T Worcestershire Sauce
- 1/2 tsp Chile Paste
- 4 Boneless Pork Chops
- 1 tsp ground Ginger
- pinch of cinnamon
- 2 T vegetable oil
- 1/2 cup white wine
- salt and pepper to taste
 |
| Looks pretty good, huh? |
Allrecipes Spicy Peach Glazed Pork Chops (I think mine look better)
 |
| oven roasted potatoes as a side |
Well it happened again
Well for those readers that have been following this blog for a couple of years you are familiar with the fact Ike partially tore his Achilles tendon a couple of years ago and he was in a cast/splint from April until the end of July. Well as of last Friday, he did it again. No idea how he did it, we were in the back yard playing fetch like we have 1000 time before and he took off after the stick and about 15 feet away he yelped and started holding the same leg up...
So I took in to the emergency vet hospital (the same one that worked on him before) and lucky for me the surgeon that worked on him before was just getting out of a different surgery and consulted with the ER Vet and said, "Looks like he aggravated it again... Soooooo here we are again with the same splint as before.. And Hunting season is just about 8 weeks away.

I will keep everyone up to speed, as we don't go back for another week or so for a status check.. A funny aside to this, is This happened a week ago Friday, and we had our neighborhood block party the next day and Ike was the hit of the party.. All the kids were giving him so much affection... Everybody sure loves Ike...
 So Sunday we were all relaxing after the party and Ike go up from the chair and walked right out of the splint.... Sandy and I looked at each other and said, "What the heck??" So Monday on my lunch hour back to the vet we went... and they reapplied the splint.. The Tech said he was getting around quite well without it but he seems a little too active to go without it.. Ya think??? LOL... He has been a good boy with it though, not chewing on it so no "cone of shame" necessary.....
More to come but no "Ike, find that bird" at least for a while.
So I took in to the emergency vet hospital (the same one that worked on him before) and lucky for me the surgeon that worked on him before was just getting out of a different surgery and consulted with the ER Vet and said, "Looks like he aggravated it again... Soooooo here we are again with the same splint as before.. And Hunting season is just about 8 weeks away.
I will keep everyone up to speed, as we don't go back for another week or so for a status check.. A funny aside to this, is This happened a week ago Friday, and we had our neighborhood block party the next day and Ike was the hit of the party.. All the kids were giving him so much affection... Everybody sure loves Ike...
So Sunday we were all relaxing after the party and Ike go up from the chair and walked right out of the splint.... Sandy and I looked at each other and said, "What the heck??" So Monday on my lunch hour back to the vet we went... and they reapplied the splint.. The Tech said he was getting around quite well without it but he seems a little too active to go without it.. Ya think??? LOL... He has been a good boy with it though, not chewing on it so no "cone of shame" necessary.....More to come but no "Ike, find that bird" at least for a while.
Sunday, July 13, 2014
Polenta, Grits, Mush - what's in a name?
Hi everyone,
You know I never liked mush growing up, and grits never really appealed to me either, but as I have gotten a little more "adventurous" in what I will eat I have really started to like polenta.. I know, I know it's made of the same ingredients but somehow it seems to be better, when a braised short rib is resting on it and it is swimming in the juices... YUM... OK so I had this big Sirloin I wanted to cook and I didn't want risotto, or potatoes so I thought, let's try some polenta - but grill it..
So I got some coarse corn meal and followed the instructions water, salt, cornmeal but of course I wasn't satisfied with that so I added some Pecorino and Parm cheeses as well as some fresh thyme and rosemary and a little freshly cracked black pepper to the mix. I then put in mini loaf pans and chilled it for 24 hours.
I took it out and sliced it in about quarter inch thick slices and grilled it next to the Sirloin steak..
I took the Sirloin, and salted it and let it draw out some of the proteins uncovered in the fridge and then seared it very rare on the grill.. Sliced it like London broil and served it with the Grilled Polenta and some steamed broccoli.... Very tasty...
Take a look :)
 |
| Colorful, huh? |
Thursday, July 3, 2014
New things
Now that we have cleaned up our mess from the storm I wanted to get back to cooking... So here are a couple of pics of some of my first tomatoes of the season and my new Himalayan Salt Cooking Stone. Can't wait to try it so look out for some interesting posts and a review of how it works.. Hear great things about it but also some not so great things - but I will have an open mind.... and a fair review...
Happy 4th of July - Hey don't forget to thank a Veteran for the freedoms we enjoy - Freedom isn't FREE.
Happy 4th of July - Hey don't forget to thank a Veteran for the freedoms we enjoy - Freedom isn't FREE.
 |
| Not too big but I bet they taste good |
 |
| First of July - not too bad, huh? |
 |
| Himalayan Pink Salt Block - Man is that heavy |
Tuesday, July 1, 2014
Stormy Weather...
Well, for once the weathermen (and ladies) were correct. They had been telling us to, as one weatherman said, "Go home and batten down the hatches" and they were right... First storm hit about 6:45, and wouldn't you know it I was right in the middle of making myself a flatbread pizza... Well, the tornado siren was blaring, Sandy and Ike were headin' to the basement and I was still cutting my flatbread... A man has to have his priorities, right???
So the first storm came and went - Lots of wind and rain but no damage, as we did what the weatherman said, and took things down or took them in and wedged them in where no harm could come to them. So we had a respite between storms and while it was quite a lightning storm, we thought the worst was over.... Boy were we wrong, About 9:30 I was watching Longmire on A&E (great show by the way - if you haven't seen it you need to check it out - but I digress) and all of a sudden, the NOAA weather alarm started blaring a tornado warning, and rotation was spotted on radar just south of us... So I told Sandy she and Ike should head down to the basement while I checked things out... The next thing I heard was a big CRACK and thought to myself, "That ain't good".. So I headed down with them for the next 45 minutes until the Tornado Warning expired... Came back up about 10:15 and the last two of our original Bradford Pear trees were no longer vertical - or at least one of them wasn't the other one had half of it down in the bean field behind us beside the entire the far east one both resting on our fence. That's gonna leave a mark....
So after going out and checking the rest of the house (no damage so I consider ourselves lucky) I emailed work and said. "Taking a personal day tomorrow!" So in the day light it wasn't too bad but man, 12 year old trees that are 40' tall and 30+" in circumference have lots of branches!!! It took us all day but we got it cut up and stacked - saved bigger pieces for firewood, and now I know what I will be doing over the holiday- firing up the wood chipper - anybody want some Mulch??? LOL. So all in all we are much better off than many, all three of us live to cook another day, and no real permanent damage.. so I consider us pretty lucky as the town we go pheasant hunting in suffered a direct hit by a tornado about 10 days ago...
Check out the pics below... Note again who was supervising...
 |
| Tree Before |
 |
| Tree After |
 |
| Both trees |
 |
| Different Angle One on the right may need to come down completely |
 |
| Here is the boss - Supervising is tough work |
Wednesday, June 25, 2014
Rollin', Rollin', Rollin'...
No I haven't been watching marathons reruns of Rawhide, but I am wanting to share my cabbage roll recipe. Well, not mine really but one from All Recipes web site. We recently had a belated Father's day celebration for my Father in Law and we planned (and had) a cookout - in the middle of a TORRENTIAL downpour - you know hamburgers, hot dogs baked beans etc. But my sister in law requested these cabbage rolls. We had them over once before and they liked them so well that she asked for them for the party.. Well, they are so easy and a make and forget type meal that I had no problem accommodating her request. 30 minutes prep time, put 'em in the crock pot and don't take the lid off for 8 hours or so... You check 'em in 8 hours and they are ready to eat... I doubled the recipe for this group as they like take home packages :) .
Recipe makes 6 servings
In large bowl, combine 1 cup cooked rice, egg, milk, onion, ground beef, salt, and pepper. Place about 1/4 cup of meat mixture in center of each cabbage leaf, and roll up, tucking in ends. Place rolls in slow cooker.
In a small bowl, mix together tomato sauce, brown sugar, lemon juice, and Worcestershire sauce. Pour over cabbage rolls.
(If you like a lot of sauce, double the sauce recipe for the number of cabbage rolls. For me, I doubled the cabbage rolls but tripled the sauce recipe and it was perfect)
Cover, and cook on Low 8 to 9 hours.
Gotta tell you easy and very good....
Now I have to go check on Ikey... He is sleeping in the chair....
 |
| Boiling the leaves makes them pliable |
 |
| The stuffing Lots of black pepper but really good. |
 |
| Roll 'em up |
 |
| Nice little packages |
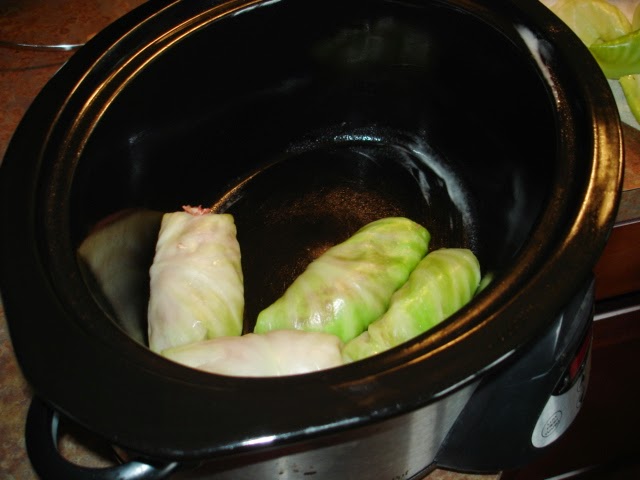 |
| Layer them in the Crock pot - some people layer extra cabbage leaves on bottom |
 |
| Pour the sauce over the top put the lid on and leave 'em for 8 hours |
Recipe makes 6 servings
12 leaves cabbage
1 cup cooked white rice
1 egg, beaten
1/4 cup milk
1/4 cup minced onion
1 pound extra-lean ground beef
1 1/4 teaspoons salt
1 1/4 teaspoons ground black pepper
For the Sauce
1 (8 ounce) can tomato sauce
1 tablespoon brown sugar
1 tablespoon lemon juice
1 teaspoon Worcestershire sauce
Bring a large pot of water to a boil. Boil cabbage leaves 2 minutes; drain.
In a small bowl, mix together tomato sauce, brown sugar, lemon juice, and Worcestershire sauce. Pour over cabbage rolls.
(If you like a lot of sauce, double the sauce recipe for the number of cabbage rolls. For me, I doubled the cabbage rolls but tripled the sauce recipe and it was perfect)
Cover, and cook on Low 8 to 9 hours.
Gotta tell you easy and very good....
Now I have to go check on Ikey... He is sleeping in the chair....
Tuesday, June 10, 2014
Lasagna Pinwheels
Hi everyone...
Had a rainy day here and thought that pasta with meat sauce would be a nice thing to cook since grilling was a "washout". I had made a variant of these before but thought I would try something a little different - but I can't take all the credit... Sandy said instead of stuffing shells try making lasagna pinwheels. So I thought what the heck, why not.
It really is simple - any red sauce (or gravy as my Italian friends call it) would work - but we had made and frozen in pint containers some of our home made sauce.. So I thawed one of those in the fridge and then started the process.
I decided to use a 9 X 9 inch pan and sprayed it with a non stick spray.
Boiled 8 lasagna noodles in salted water for about 10 minutes. Removed and rinsed and cooled so I could handle them. Now for the cheese stuffing.
2 eggs
1 small (15 oz.) container of Ricotta cheese
1/2 C Grated Parmesan Cheese
1/8 tsp of thyme, basil, oregano, and dried parsley
1/8 tsp of fresh ground pepper
1/4 C Chopped onion
(recipe called for 1/2 cup thawed Spinach chopped drained very well - I didn't have any so I didn't use it but
1tsp of Chicken Bullion (trust me no salt needed in this recipe)
1/2 cup Shredded Mozzarella (I uses a blended mix of cheeses and it worked beautifully)
Add'l Shredded cheese and grated Parm for the top as well.
2 - 2 1/2 Cups of your favorite red sauce - we used 2 cups but think a little more would have been bettter
Mix all stuffing ingredients up in a mixer - I have been informed that while mixing it by hand will work, using an electric mixer will make the stuffing much smoother and silkier - mine always used to be grainy so even though it dirties a few more dishes - it's worth it.
Pre heat oven to 350*
Ladle small amount of sauce on the bottom of the pan
Lay Lasagna Noodles on flat surface (like your cutting board)
Using an off-set spatula smooth about 1/4' thick layer of stuffing on the Noodle - stopping about 1" from the end of the noodle.
Start at the other end and carefully roll up the noodle so that it resembles a pinwheel. You will see why you don't "butter the noodle" all the way to the end when you roll up your first one - trust me.
Take pinwheel and carefully place seam side down in the pan. Repeat... If you are like me you will have two rows of 3 with room for 2 rolls perpendicular to the other 6 between the rows of 3 for a total of 8.
Take the remaining sauce and ladle over the top of the noodles, sprinkle with remaining Shredded Moz and Parm cheese and place in oven for approx. 40 minutes until bubbly. The last 5 minutes you may want to broil to get a crusty top on the cheese... Notice the lasagna type layers.... Now I would think some sautéed mushrooms, large diced green peppers might be a variation since each one is "self contained it might be a perfect way to customize your lasagna for a family of picky eaters.
 |
| Looks pretty tasty to me |
It really is simple - any red sauce (or gravy as my Italian friends call it) would work - but we had made and frozen in pint containers some of our home made sauce.. So I thawed one of those in the fridge and then started the process.
I decided to use a 9 X 9 inch pan and sprayed it with a non stick spray.
Boiled 8 lasagna noodles in salted water for about 10 minutes. Removed and rinsed and cooled so I could handle them. Now for the cheese stuffing.
2 eggs
1 small (15 oz.) container of Ricotta cheese
1/2 C Grated Parmesan Cheese
1/8 tsp of thyme, basil, oregano, and dried parsley
1/8 tsp of fresh ground pepper
1/4 C Chopped onion
(recipe called for 1/2 cup thawed Spinach chopped drained very well - I didn't have any so I didn't use it but
1tsp of Chicken Bullion (trust me no salt needed in this recipe)
1/2 cup Shredded Mozzarella (I uses a blended mix of cheeses and it worked beautifully)
Add'l Shredded cheese and grated Parm for the top as well.
2 - 2 1/2 Cups of your favorite red sauce - we used 2 cups but think a little more would have been bettter
Mix all stuffing ingredients up in a mixer - I have been informed that while mixing it by hand will work, using an electric mixer will make the stuffing much smoother and silkier - mine always used to be grainy so even though it dirties a few more dishes - it's worth it.
Pre heat oven to 350*
Ladle small amount of sauce on the bottom of the pan
Lay Lasagna Noodles on flat surface (like your cutting board)
Using an off-set spatula smooth about 1/4' thick layer of stuffing on the Noodle - stopping about 1" from the end of the noodle.
Start at the other end and carefully roll up the noodle so that it resembles a pinwheel. You will see why you don't "butter the noodle" all the way to the end when you roll up your first one - trust me.
Take pinwheel and carefully place seam side down in the pan. Repeat... If you are like me you will have two rows of 3 with room for 2 rolls perpendicular to the other 6 between the rows of 3 for a total of 8.
Take the remaining sauce and ladle over the top of the noodles, sprinkle with remaining Shredded Moz and Parm cheese and place in oven for approx. 40 minutes until bubbly. The last 5 minutes you may want to broil to get a crusty top on the cheese... Notice the lasagna type layers.... Now I would think some sautéed mushrooms, large diced green peppers might be a variation since each one is "self contained it might be a perfect way to customize your lasagna for a family of picky eaters.
 |
| everything stayed together nicely |
 |
| Notice the layers |
Monday, June 9, 2014
Still smokin'
As you know it is BBQ season and I put my money where my mouth (blog) is as it pertains to brining, so we had a 8 - 9 lb. Turkey Breast in the freezer. So we thawed it in the fridge for about 5 days and then Brined it and smoked it this weekend... I used a variant of a Bourbon brine below and have to say that the brown sugar made a nice mahogany skin.
Bourbon Turkey Brine

 Tender and Juicy.. We called the family - Like how are two of us (sorry Ike doesn't get any of this) going to eat this much :)??? and the caravan ensued... It had a nice smoke ring will make some tasty sandwiches
Bourbon Turkey Brine
Sunday, June 1, 2014
Catching up with more cooking things
As you know I haven't been posting regularly but I didn't stop cooking - but I am going to post some various pictures and events we had over the past few months..
October 2013 - Our old neighbors Jeff and Tammie left the neighborhood to move back to downtown Chicago and we went down to visit and participate in a Pizza tour of Chicago. We walked all over downtown and sampled all of the well known pizza places and learned a little about the history of Deep Dish (Chicago Style) pizza... Pizzeria Uno, Geno's, Giordano's and a little place called Pizza Ora. Really that was our favorite... Lot of fun and good times
 Sandy and one of the neighbors got together an "ornament exchange" brunch prior to Christmas for all of the Ladies in the neighborhood and I volunteered to cook... The menu consisted of Eggs Benedict, French Toast casserole, Mimosa's and Bloody Maries. I made a home made Hollandaise Sauce for the Eggs Benedict in a blender recipe and it was very good. It stayed very stable as I took a page out of Alton Brown's book and charged a thermos with boiling water, drained it and then put in the sauce... It stayed very hot and I was able to add it right before serving... here is the link to the recipe;
Blender Hollandaise
We also had some non breakfast items - and deserts but if you remember my little roast beef appetizers on mini pancakes were a hit and provided some very needed savory "yang" to all the sweet "ying" of the pastries and other treats...
One other thing I made was little caviar topped fingerling potatoes. Very easy and very delicious. Recipe goes like this:
Clean fingerling potatoes, and boil in HEAVILY salted water. (I used about double the salt I normally boil potatoes in... when soft (about 15 -20 minutes remove from heat and drain) Let cool so you can handle them. (this can all be done the day before). I sliced them into about 1inch lengths and used a corer to dig out a little indentation about a third of the depth of the potato. I purchased some crème fraiche (I like it better that traditional sour crème in this recipe) and piped in a small amount of that into the indentation and then using chopsticks placed the caviar on top of the crème fresh. It does have the WOW factor. :)
October 2013 - Our old neighbors Jeff and Tammie left the neighborhood to move back to downtown Chicago and we went down to visit and participate in a Pizza tour of Chicago. We walked all over downtown and sampled all of the well known pizza places and learned a little about the history of Deep Dish (Chicago Style) pizza... Pizzeria Uno, Geno's, Giordano's and a little place called Pizza Ora. Really that was our favorite... Lot of fun and good times
 |
| Here we are on the walking Pizza Tour |
You all know what it is like to use up leftovers from Thanksgiving so I made a "Shepard's Pie" of sorts with the leftover turkey, gravy, corn, and mashed potatoes. I used a small little cast iron single serve vessel, layered the leftovers and baked it in the oven until the potatoes were brown and crusty. With a little cranberry sauce on the side it was like your Thanksgiving plate all in one dish... It was Tasty
 |
| Sheppard's Pie Steve Style |
For Christmas Sandy got me a Calzone maker so I made some cooked some Italian Sausage, sautéed some mushrooms and green and red peppers and made a stuffed calzone... Be creative - you can Stuff it with whatever you like but a little marinara for dipping and you have a quick and filling midweek dinner. I used readymade pizza crust and it turned out pretty nice for the first time use... |
| Calzone |
Blender Hollandaise
 |
| Roast Beef bites |
One other thing I made was little caviar topped fingerling potatoes. Very easy and very delicious. Recipe goes like this:
Clean fingerling potatoes, and boil in HEAVILY salted water. (I used about double the salt I normally boil potatoes in... when soft (about 15 -20 minutes remove from heat and drain) Let cool so you can handle them. (this can all be done the day before). I sliced them into about 1inch lengths and used a corer to dig out a little indentation about a third of the depth of the potato. I purchased some crème fraiche (I like it better that traditional sour crème in this recipe) and piped in a small amount of that into the indentation and then using chopsticks placed the caviar on top of the crème fresh. It does have the WOW factor. :)
 |
| Fingerling potatoes with crème fraiche and caviar |
Tuesday, May 27, 2014
Some pics of Ike this winter..
Since this is Ike's Blog I thought I would share with you some pics of Ike this winter...
 |
| trust me its over there - now don't miss |
 |
| What - I'm working here |
 |
| Oooh I want a meatball |
 |
| Worth the work |
 |
| Lovin' the snow |
I'm Baaaaaaaaaaack
Hi everyone;
It sure has been a while and really I am sorry for the significant lag time between posts.
But the subject of this post will be Brining...
I have really turned to brining for many of the leaner cuts of meat... Pork, Chicken and even Pheasant. Brines use osmosis to add moisture to super lean cuts of meat - and technically it is a salt solution that while sounding counter intuitive, it really does add moisture...
I am no Alton Brown here so trust me I am not going try and explain it - so with credit to the fine cooking website here is the basic premise behind brining..
.
How a brine works
Moisture loss is inevitable when you cook any type of muscle fiber. Heat causes raw individual coiled proteins in the fibers to unwind—the technical term is denature—and then join together with one another, resulting in some shrinkage and moisture loss. (By the way, acids, salt, and even air can have the same denaturing effect on proteins as heat.) Normally, meat loses about 30 percent of its weight during cooking. But if you soak the meat in a brine first, you can reduce this moisture loss during cooking to as little as 15 percent, according to Dr. Estes Reynolds, a brining expert at the University of Georgia.
Brining enhances juiciness in several ways. First of all, muscle fibers simply absorb liquid during the brining period. Some of this liquid gets lost during cooking, but since the meat is in a sense more juicy at the start of cooking, it ends up juicier. We can verify that brined meat and fish absorb liquid by weighing them before and after brining. Brined meats typically weigh six to eight percent more than they did before brining—clear proof of the water uptake.
Another way that brining increases juiciness is by dissolving some proteins. A mild salt solution can actually dissolve some of the proteins in muscle fibers, turning them from solid to liquid.
Of all the processes at work during brining, the most significant is salt's ability to denature proteins. The dissolved salt causes some of the proteins in muscle fibers to unwind and swell. As they unwind, the bonds that had held the protein unit together as a bundle break. Water from the brine binds directly to these proteins, but even more important, water gets trapped between these proteins when the meat cooks and the proteins bind together. Some of this would happen anyway just during cooking, but the brine unwinds more proteins and exposes more bonding sites. As long as you don't overcook the meat, which would cause protein bonds to tighten and squeeze out a lot of the trapped liquid, these natural juices will be retained.
Don't brine "extra tender" pork - it has already been injected with fluids to make it more juicy...
Remember the proper proportion of salt (use KOSHER not Table Salt) is important so find a recipe you like and use it - you won't be disappointed - Experiment with other flavors to go along for the osmotic ride... Some of my additions to the brining liquid are;
Sugar, Bay Leaf, Corriander Seeds, All Spice Berries, Juniper Berries, Peppercorns, Citrus (oranges mostly) Mustard seeds. Hint - if you have a mortar and pestle crack the seeds, berries and peppercorns to release some of their oils...
Make sure the meat is completely covered and kept at approximately 40* (fridge works for smaller pieces) but for a lot or even a whole turkey I use a big water cooler (like the kind used by road crews to drink water out of) Just make sure you add ice, and bring the brine back to room temp before you add the meat - you want to brine it not boil it!! Add ice and the meat (keep meat fully submerged) and follow the standard brining times below... Don't over brine and make sure you rinse off and pat dry the meat after removing it from the brine...
Here is a pic of me cooking some America's Cut Pork Chops I had brined for about 4 hours
 |
| The Webber Ranch Kettle in action |
Maximum Brine Time
If meat is kept past the maximum brine time, it will taste salty and perhaps turn mushy. Start out at the low end of the range. The table below shows suggested brine times for the corresponding meat.| Meat | Brine Time |
|---|---|
| Whole chicken (4 pounds) | 4-8 hours |
| Chicken parts | 1 1/2 hours |
| Chicken breasts | 1 hour |
| Whole turkey | 12-24 hours |
| Pork chops | 2-8 hours |
| Whole pork loins | 1-3 days |
| Pork Tenderloin | 2-12 hours |
| Shrimp | 1/2 hour |
| Cornish game hens | 1-2 hours |
Subscribe to:
Posts (Atom)